PeripheralsEdit
Notes on peripherals because, believe it or not, my cable management is so obsessive that actually getting around the back of my desk and figuring out what is plugged into what is kind of difficult.
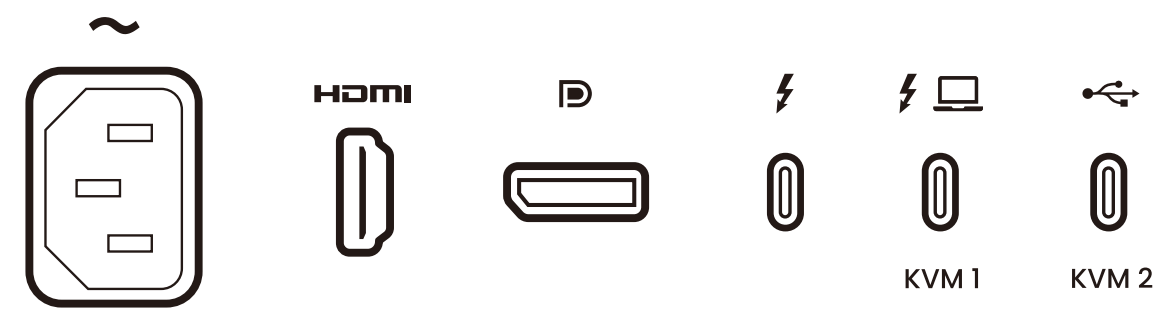
Display
BenQ PD2730s (5K), which has:
- HDMI (v2.1): Using this to connect the desktop PC.
- DisplayPort (v1.4)
- Thunderbolt 4: Connected to Mac via dock, as described below (BenQ recommends using Thunderbolt for connecting to Macs)
This is an upgrade from the BenQ 2700U (4K), bringing the following spec bumps:
- 3840x2160 resolution → 5120x2880
- 1200:1 contrast ratio → 2000:1
- Increased color gamut (eg. 99% sRGDB / 99% Rec. 709 / 90% DCI-P3 → 100% / 100%/ 98%)
- HDMI 2.0 → 2.1
- The built-in speakers go from 3W → 5W.
However, there is one notable downgrade: the monitor is thicker than the old one; too thick for the Elgato Facecam mount to sit in the center of the display (instead if has to sit towards the side, where the display is thinner). I'll have to find an alternative mount.
For comparison, here are the ports on the old model.

I never used the "hub" functionality in the old model because it was not reliable enough in my experience.
Dock
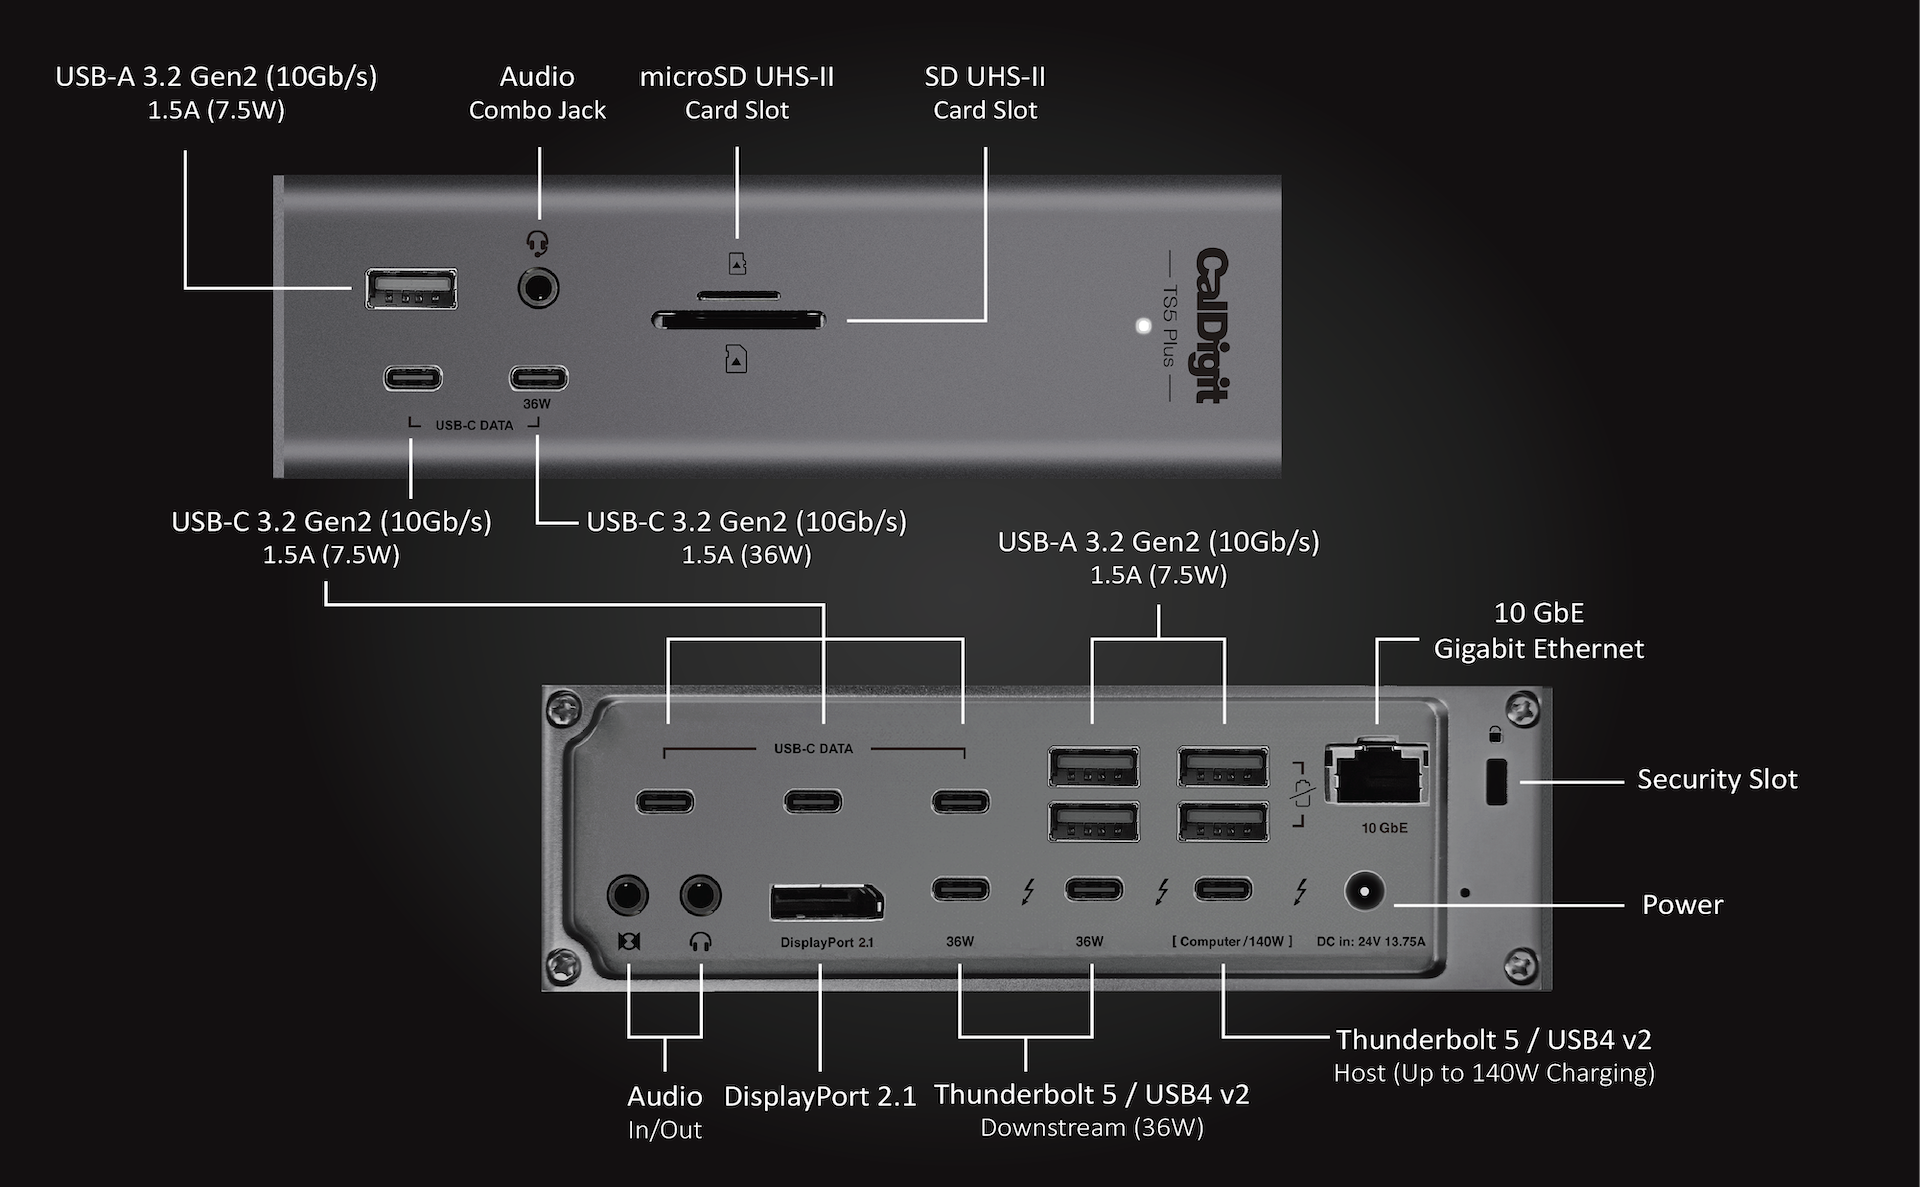
On the front:
- USB-C port to Lightning + USB-C (via this expensive cable): This port (the one on the right) offers 36W of "offline" charging1, which I mostly use for the "Magic" Trackpad2 or random mobile phones.
On the back, from left to right (as viewed from the back):
- Bottom row:
- DisplayPort 2.1 connector: unused.
- Thunderbolt 5 (36W port): USB-C/Thunderbolt connector runs to monitor using BenQ-supplied Thunderbolt 4 cable.
Thunderbolt 5 (36W port): USB-C/Thunderbolt connector running to micro-USB connector on power port of UGREEN switching hub; this provides 36W of "offline" power, which is more than the switch actually needs (it asks for 5V 2A; ie. 10W).3- Thunderbolt 5 (host port, 140W): USB-C/Thunderbolt connector running to laptop (USB-C/Thunderbolt port)
- DC in (24V 13.75A): power in
- Top row:
- USB-A 3.2 Gen2: USB-A connector to data port (2) on back of UGREEN switching hub.
- 10 GbE: Gigabit ethernet, via crossover cable to desktop PC
See this page for firmware updates. Last time I updated was 2025-11-11 (to v64.1).
USB switching hub
UGREEN 2-in 7-out USB 3.0 switch:
- Front (inputs, from left to right, as viewed from the front):
- Micro-USB: remote control port (unused; I use the button on top of the unit instead)
- USB-C port: unused
- USB-C port: unused
- USB-C port: unused
- USB-A port: Realforce keyboard (terminating with a micro-USB connector)
- USB-A port: Elgato Facecam (terminating with a USB-C connector)
- USB-A port: RØDE AI-1 audio interface for microphone (terminating with a USB-C connector)
- USB-A port: Logitech MX Master mouse radio receiver
- Rear (from right to left, as viewed from the back):
- Output 1: USB-A to USB-A cable to desktop PC
- Output 2: USB-A to USB-A cable to dock (for use with laptop)
- DC in (12V 2A, ie. 24W): power in

For comparison, here's what I had under the old model (a UGREEN 4-port USB 3.0 switch):
- Front (inputs, from left to right, as viewed from the front):
- USB-A port: Realforce keyboard (terminating with a micro-USB connector); note, the keyboard itself has a small hub, but it's unused.
- USB-A port: RØDE AI-1 audio interface for microphone (terminating with a USB-C connector)
- USB-A port: Elgato Facecam (terminating with a USB-C connector)
- USB-A port: Radio receiver for the Logitech MX Master 3 mouse.
- Rear (from right to left, as viewed from the back):
- Output 1: USB-A to USB-A cable to desktop PC
- Output 2: USB-A to USB-A cable to dock (for use with laptop)
- Micro-USB: additional power in, which should be 5V 2A (ie. 10W) according to the manufacturer
- Top (status lights, from left to right, as viewed from the front):
- Output 1 active (desktop PC)
- Output 2 active (laptop)
Note on the ordering of the outputs/lights: I chose to do it this way so that the light on the left (output "1", the PC) corresponds to the input-selection button to the left on the display; likewise, the light on the right (output "2", the laptop) corresponds to the input-selection button to the right on the display.
UPS
I have APC Back-UPS Pro BR1600SI (1600VA/960W) UPS with the following ports:
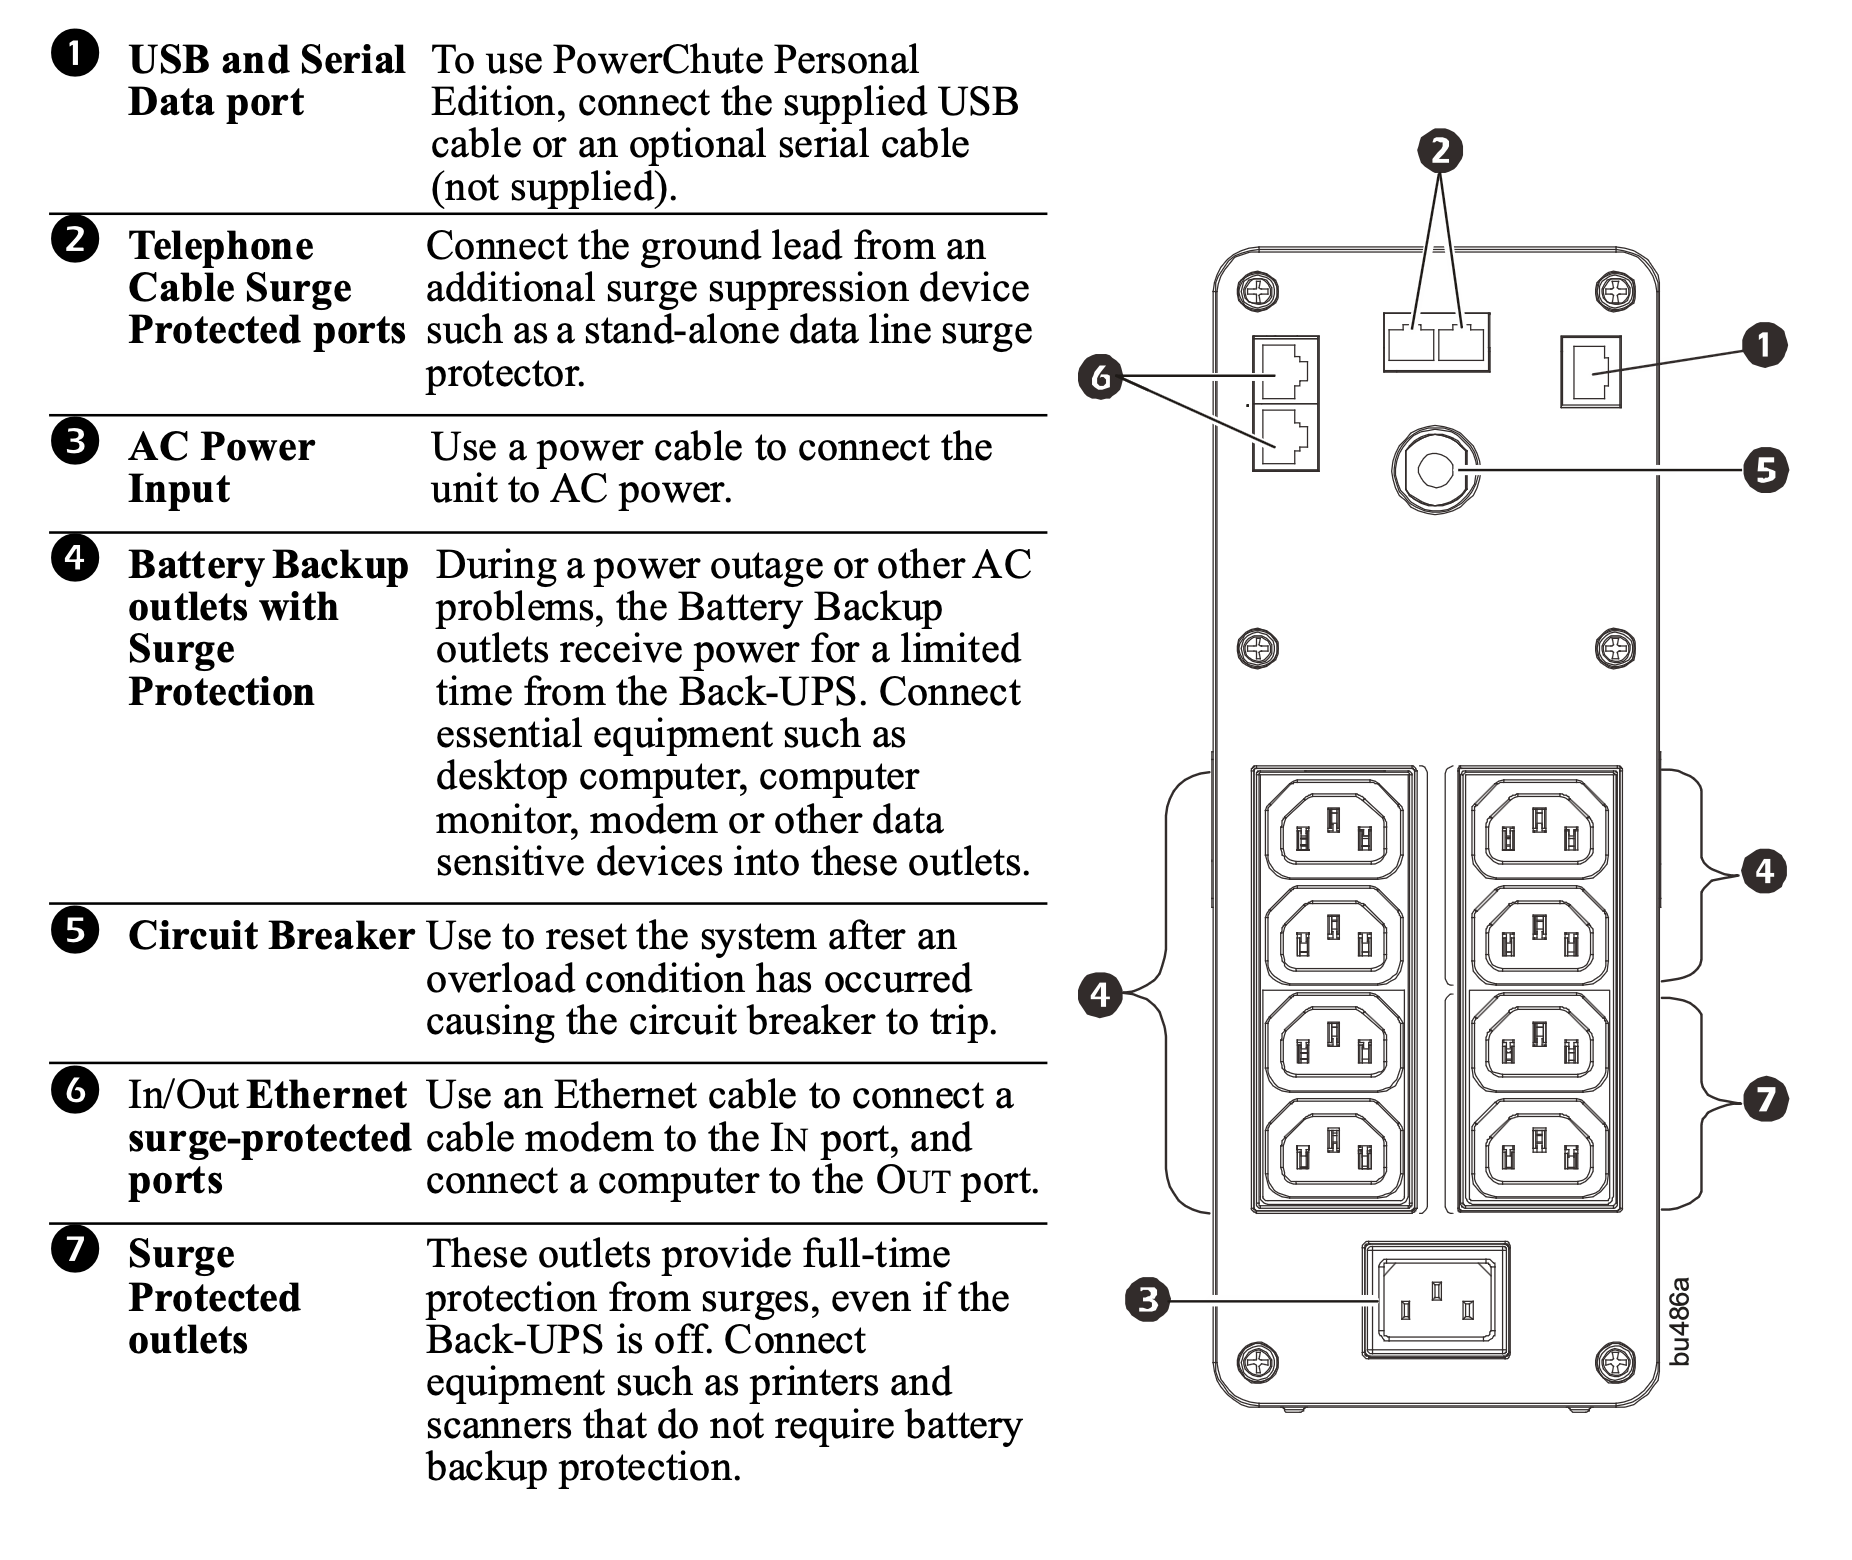
There are ports on the back that offer surge protection and battery backup (labeled "4" in the diagram), and others that offer only surge protection (labeled "7" in the diagram); I'm only using the former4; that is, I have cables with IEC C13/C14 connectors leading from the UPS to:
- The desktop computer.
- The monitor.
- The dock.
The data connection on the UPS (labeled "1" in the diagram) runs to the desktop computer (because the laptop doesn't care about the power going out in the same way the desktop does).
The UPS itself is plugged in (via port labeled "3" on the diagram) into power strip, in turn plugged into the wall.
Items not plugged into the UPS include:
- Printer (plugged directly into power strip, in turn plugged into the wall).
- El Gato light (plugged into power brick mounted on table leg, in turn plugged into a white extension cable, in turn plugged into power strip, in turn plugged into the wall).
Appendix: A note on units
The documents provided by the manufacturers use a mixture of different units (volts, amps, and watts5) in various places. In order to convert between different units, consider this relationship:
Power (Watts) = Voltage (Volts) × Current (Amps)
So, for example, as noted above, where above the USB switch says it wants to receive "5V 2A" over its Micro-USB port, that can be considered equivalent to 10W. So, plugging it into one of the 7.5W USB-A ports on the dock is insufficient, but using one of the 36W USB-C (Thunderbolt) ports is more than enough. Likewise, where the dock expects its power supply to deliver "24V 13.75A", that equates to 330W overall.
-
"Offline" means it provides power even when the "host" device — that is, the laptop — is not connected. This is true of all USB-C ports on the dock, the front USB-A port, and two of the rear USB-A ports. ↩
-
🤦♂️ ↩
-
After adding the RØDE AI-1, I found the dock was no longer supplying power to the laptop, presumably because it was too taxed supplying power to the hub, so I removed this cable from the dock and replaced it with a separate power adapter providing 15 W / 2 A (again, note that the hub says it optionally uses "5V 2A; ie. 10W"). However, I was still having problems with the dock not powering the laptop, so I tried out a different switch. That worked for less than 24 hours. Finally, a firmware update to the dock seemed to fix things definitively. ↩
-
If the laptop, monitor, dock, and desktop are all running and under load, the UPS is probably not qualified to support all of these devices, but I'm not expecting to run them all under load very frequently, if ever, so I'm trusting that this is going to be ok. ↩
-
I'm not an electrical engineer, but my understanding of these terms is as follows — volts: a measure of the difference in electrical potential energy (ie. capacity to do work, move charge around a circuit); amps: a measure of the current (charge) flowing through the circuit; watts: a measure of the rate of energy transfer. Given that amps and watts both describe transfer rates, it's helpful to realize that amps relate to charge (coulombs) while watts relate to energy (joules). Charge is a property of material that creates electric forces, energy is the more general capacity to do work (more general because it comes in many forms — such as kinetic, potential, and so on — and can be exchanged between them). ↩